How to use the net user command to change the user password at a Windows command prompt. Only administrators can change domain passwords at the Windows command prompt. To change a user's password at the command prompt, log on as an administrator and type: "net user * /domain" (without the quotation marks)
When you are prompted to type a password for the user, type the new password, not the existing password. After you type the new password, the system prompts you to retype the password to confirm. The password is now changed.
Alternatively, you can type the following command: net user . When you do so, the password changes without prompting you again. This command also enables you to change passwords in a batch file.
Non-administrators receive a "System error 5 has occurred. Access is denied" error message when they attempt to change the password
How to Change User Password at Command Prompt
Setting Up a Secure Guest Account
By default, the Guest account has access to your computer's programs, to files in the Shared Documents folder, and to files in the Guest profile. But no password is required to use the account, so you'll want to be sure that the Guest account doesn't expose items that a casual user shouldn't see or modify. In fact, the default settings place pretty tight restrictions on the Guest account, but you should ensure that these rather obscure settings are still in place:
Prevent network logon by the Guest account.
This prevents a user at another computer from using the Guest account to log on over the network. In Local Security Settings (Secpol.msc), open Local Policies, User Rights Assignment. Be sure that Guest is listed in the Deny Access To This Computer From The Network policy.
Do not include Guest in this policy if you use Simple File Sharing and you are sharing your computer's folders or printers. Simple File Sharing requires the use of the Guest account for network access.
Prevent a Guest user from shutting down the computer.
In Local Security Settings, open Local Policies, User Rights Assignment. Be sure that Guest is not listed in the Shut Down The System policy. (Even with this policy in place, anyone-including guests-can shut down the computer from the Welcome screen. You can set a policy that allows only a logged-on user to shut down the computer. To do that, open Local Policies, Security Options and disable the Shutdown: Allow System To Be Shut Down Without Having To Log On policy.)
Prevent a Guest user from viewing event logs.
In Registry Editor, open HKLM\System\CurrentControlSet\Services\Eventlog. Visit each of the three subkeys-Application, Security, and System-and be sure that each contains a DWORD value named RestrictGuestAccess set to 1.
Quick SHUTDOWN
1. Open Task manager (By Ctrl+Alt+Del or R.click on the taskbar and select Task manager)
2.Hold Ctrl + Shift and select Shutdown menu and click Turn Off
Direct Bootup Without Typing Password
1. At a command prompt, type "control userpasswords2" and press Enter.
2. On the Users tab, clear the Users Must Enter A User Name And Password To Use This Computer check box and then
click OK.
3. In the Automatically Log On dialog box that appears, type the user name and password for the account you want to be logged on each time you start your computer.
NTLDR (or) NTDETECT.COM not found
1. Copy NTLR and NTDETECT.COM files from /I386 folder of windows XP CD to "C:\".
Note: For FAT partition use Win 98 Start up disk.
Incase of NTFS partition use Win 2000 CD Recovery console or "NTFS 4 DOS"
HAL.DLL missing or corrupted
This problem is due to misconfigured "Boot.ini" file.
solution:
1. Boot using Windows XP CD and Select Repair
2."Bootcfg /list" use this command to verify Boot.ini file.
3. "Bootcfg /rebuid" use this command to repair Boot.ini file now restart the computer.
Joining a workgroup through scripting
Microsoft removed from the utility netdom.exe the ability to join a computer to a workgroup. However, they kept on their FTP server the good old one shipped with Windows NT4.
Grab it and keep it near your usual tools, it’s still useful. For example, i’m using it in a script in order to do a domain rejoin of a workstation.
Restoring Active Directory without headhaches
If you work in a small business, you know that you can’t have all the hardware you need in order to keep IT up and running everytime. I’ve experienced the pain of lacking an UPS for my servers and as a result, my entire Active Directory domain was… corrupted after some power shortage. I tried everything, every Microsoft advices, no luck.
Fortunately, I had a good and full image of the main server, made with the excellent DriveImage XML (Free and hotghosting is possible!)
But… I didn’t know that the workstations change automatically their passwords every 30 days for security purposes. So, my restored server just can’t establish the security channel between it and the workstations. Here are some steps to prevent the changes:
- Start Registry Editor. To do so, click Start, click Run, type regedit in the Open box, and then click OK.
- Locate and then click the following registry subkey: HKEY_LOCAL_MACHINE\SYSTEM\CurrentControlSet\Services\Netlogon\Parameters
- In the right pane, click the DisablePasswordChange entry.
- On the Edit menu, click Modify.
- In the Value data box, type a value of 1, and then click OK.
- Locate and then click the following registry subkey: HKEY_LOCAL_MACHINE\SYSTEM\CurrentControlSet\Services\Netlogon\Parameters
- On the Edit menu, point to New, and then click DWORD Value.
- Type RefusePasswordChange as the registry entry name, and then press ENTER.
- On the Edit menu, click Modify.
- In the Value data box, type a value of 1, and then click OK.
Fixing the “IIS Worker Process” crash on Windows Server 2003
If at each reboot of your server, IIS Worker Process crashes (ex: with WSUS 3.0) , just solve this annoying problem with this :
- Go to registry : HKEY_LOCAL_MACHINE\SYSTEM\CurrentControlSet\Services\ASP.NET_2.0.50727
- Right-click on Names and set full control for NETWORK SERVICE.
Windows XP SP3 RC “HD Audio Fix”
In Windows XP, if we need to run a High Definition Audio (HDA) device, we would have to install the Universal Audio Architecture (UAA) High Definition Audio class driver. This is either the KB835221 (for SP1) or the newer KB888111 (for SP2 or SP1).
However, this does NOT work for the latest Windows XP Service Pack 3 Release Candidate Release. If you've already tried installing the Windows XP Service Pack 3 Release Candidate v3264 with a High Definition Audio (HDA) device in your computer, I'll bet you have encountered problems with the audio drivers as I did.
When you try installing the KB888111 which works for SP1 and SP2, it will not work for Service Pack 3, at least for the current SP3 RC v3264. Instead, you will be prompted with a message saying that the current service pack installed is newer than the fix you are trying to apply. Even the older KB835221 does not work.
It looks like Microsoft "forgot" to add the Universal Audio Architecture (UAA) driver for High Definition Audio devices in the latest release candidate of the Windows XP Service Pack 3. We hope they will not forget to add it into the final release. Fortunately, all is not lost. There is a way to fix this problem for the current release candidate.
Download:
Fix for KB888111 for Windows XP SP3 RC v3264 (Original)
Fix for KB888111 for Windows XP SP3 RC v3264 (Mirror)
How To: Export Thunderbird Mail to Outlook (Express)
Even though Mozilla Thunderbird is a fantastic email client, there are people who (for one reason or another) need to switch back to Microsoft Outlook Express (OE) or Outlook. However, Thunderbird still doesn't have an "Export" feature which would export mail archives in a format understandable by OE or Outlook. IMAPSize can be of great help in this process and this page explains how to perform the migration.
Mozilla Thunderbird stores emails in the mbox format. Outlook Express stores email messages in propriatory *.dbx files but understands *.eml, which are plain text files. MS Outlook stores messages in *.pst files which are binary propriatory (Microsoft) files. Here are the steps you have to take:
- Compact your Thunderbird folders (optional) — Thunderbird keeps messages in mbox files even after they have been deleted. If you don't want to include deleted messages in the conversion, you have to compact your folders in Thunderbird. Right click a folder and select "Compact This Folder". This will completely remove deleted messages from the folders mbox file.
- Locate mbox files in Thunderbird — Thunderbird stores messages in the Profile Folder, in the Mail and (if you use IMAP) ImapMail folders. Each mail folder (Inbox, Sent, etc.) is stored as two files — one with no extension (e.g. INBOX), which is the mail file itself (in "mbox" format), and one with an .msf extension (e.g. INBOX.msf), which is the index (Mail Summary File) to the mail file.
- Convert mbox files to eml files — IMAPSize has a built-in mbox2eml tool that can seemlesly convert thousands and thousands of messages. Download, install and run IMAPSize (it's free) and invoke the mbox2eml option from the Tools menu. Select the mbox file you wish to convert (you might need to set the "Files of type" option to "All Files" in the file selection dialog, since Thunderbird mbox files don't have an extension) and select a location where generated eml files should be stored. Click "Convert" and IMAPSize will start converting the files.
All the attachments will also be converted and your original Thunderbird files will not be touched. Starting from version 0.2.0. you can convert multiple mbox files at once.
- Import generated eml files into Outlook Express — Launch Outlook Express and select the local folder (or create a new one) into which you want to import your messages. Open Windows Explorer or your favourite file manager, locate the generated eml files, select them and drag and drop them into the OE application window. If Outlook Express is your email client of choice you don't have to perform the next step. (Note: Its best if you recreate an identical structure of your folders in Thunderbird in OE before importing)
- Export files from OE to Outlook — Assuming you have Outlook installed on your system, open Outlook Express and from the File menu select Export/Messages. Once exported, the messages will appear in Outlook - if they were in your inbox in OE, they'll be added to your Outlook inbox; if they were in a local subfolder in OE, a folder of the same name will be created under your Outlook inbox.
Exchange Server Remote Connectivity Analyzer (Beta)
Last month Microsoft released the “Exchange Server Remote Connectivity Analyzer tool”, from an external network you can test five different connections to your messaging platform
https://www.testexchangeconnectivity.com/default.aspx
 Announcing the release of Exchange Server Remote Connectivity Analyzer http://msexchangeteam.com/archive/2009/03/25/450908.aspx
More Exchange Server 2010 Documentation!
http://technet.microsoft.com/en-us/library/bb124265(EXCHG.140).aspx
The documentation found in the Exchange 2010 Help system is organized by content set. You can use the top-level topics within each content set to find the most appropriate Help topics when you're planning, deploying, and administering your Exchange 2010 organization.
Getting Started
Use this guide to learn the basic concepts and steps required to install a simple Exchange 2010 organization. These topics describe Exchange 2010 features and functionality and should help users new to Exchange 2010 take a first look at how they can use Exchange 2010 as an end-to-end messaging system.
- Server Role Documentation Roadmap
- Feature-Based Documentation Roadmap
- Exchange Management Console Roadmap
- What's New in Exchange Server 2010
Planning for Exchange 2010
Use this documentation set as you plan your Exchange 2010 deployment to help you design the ideal Exchange solution to meet your business needs.
- Exchange 2010 System Requirements
- Best Practices for Transitioning an Exchange Organization
- Exchange 2010 Prerequisites
- Planning for Coexistence
- Deployment Security Checklist
- Exchange 2010 Language Support
- Understanding Disjoint Namespace Scenarios
- Planning Active Directory
- Provision Exchange 2010 Server and Delegate Setup
- Planning for Client Access Servers
- Exchange Server 2010: Platforms, Editions, and Versions
- Planning for Mailbox Servers
- Planning Checklist
- Planning for Transport Servers
- Best Practices for Deploying a New Exchange Organization
- Planning for Unified Messaging
Deploying Exchange 2010
Use this documentation set as you deploy your Exchange 2010 organization and to help you deploy a solid Exchange messaging solution to meet your business needs.
- New Installation of Exchange 2010
- Post-Deployment Tasks
- Transitioning to Exchange 2010
- Deploying Client Access Servers
- Coexisting with Exchange 2010
- Deploying Mailbox Servers
- Prepare Active Directory and Domains
- Deploying Transport Servers
- Preparing Legacy Exchange Permissions
- Deploying Unified Messaging
Managing Exchange 2010
Use this documentation set to view the processes and recommended practices required to manage and maintain the Exchange 2010 environment after your Exchange organization deployment is completed.
- Exchange Management Console
- Managing Transport Servers
- Exchange Management Shell
- Managing Unified Messaging
- Managing Client Access
- Messaging Policy and Compliance
- Managing Mailbox Features
Security in Exchange 2010
Use this documentation set to view recommendations for creating and helping to secure an Exchange 2010 environment. This documentation discusses potential threats to each component of an Exchange 2010 infrastructure and makes recommendations for how to reduce those threats. For more information about security and protection with Exchange 2010, see Security and Permissions.
TechEd Online – Exchange 2010 Videos
http://www.msteched.com/online/channels.aspx?cname=track&channel=Unified+Communications
Microsoft Exchange Server 2010 Architecture (Ross Smith IV):
http://www.msteched.com/online/view.aspx?tid=067e1...2f0100
Storage in Microsoft Exchange Server 2010 (Matt Gossage):
http://www.msteched.com/online/view.aspx?tid=37c93...68ac8d
High Availability in Microsoft Exchange Server 2010 (Scott Schnoll):
http://www.msteched.com/online/view.aspx?tid=e9863...da12e3
Microsoft Exchange Server 2010 Management Tools (Evan Dodds & Paul McKnight):
http://www.msteched.com/online/view.aspx?tid=5d0ab...9bfc7a
Information Protection and Control in Microsoft Exchange Server 2010 (Ed Banti & Jesse Doughterty:
http://www.msteched.com/online/view.aspx?tid=1dd6c...1275b4
Microsoft Exchange Server Outlook Web Access 2010: The Future of Web-Based E-mail (Paul Limont):
http://www.msteched.com/online/view.aspx?tid=6c107...e926a0
Unified Messaging in Microsoft Exchange Server 2010 (Michael Wilson):
http://www.msteched.com/online/view.aspx?tid=75f67...5f1a27Webcast (English)
1 Friday
4 Monday
5 Tuesday
- 8:00 AM
TechNet Webcast: Introducing Windows Storage Server 2008 (Level 300) - 10:00 AM
TechNet Webcast: Hyper-Green Virtualization: Scaling Enterprise IT for Energy Efficiency (Level 200) - 11:00 AM
TechNet Webcast: First Look at Microsoft System Center Data Protection Manager v3 (Level 300) - 1:00 PM
IT Manager Webcast: Platform Solution Blueprints: Unified Communications (Level 200) - 1:00 PM
TechNet Webcast: Secure Collaboration using AD RMS, MOSS and AD FS (Level 300)
6 Wednesday
- 9:00 AM
Momentum Webcast: Enterprise Agreement Welcome Briefing (Level 100) - 9:00 AM
Momentum Webcast: Work Faster and Smarter with Microsoft Dynamics NAV 2009 (Level 100) - 9:00 AM
TechNet Webcast: Cloud Computing Futures: Creating Greener Clouds with Microsoft Research (Level 200) - 9:00 AM
MSDN Webcast: BenkoTips Live & On Demand: Visual Studio Debugging Demystified (Level 200) - 11:00 AM
Momentum Webcast: Grow Your Business with Microsoft Dynamics CRM (Level 100) - 12:00 PM
MSDN Webcast: geekSpeak: Parallel Computing APIs in .NET 4.0 with Mark Michaelis (Level 200) - 1:00 PM
TechNet Webcast: Security for Exchange and SharePoint - what's not in the box? (Level 200)
7 Thursday
- 9:30 AM
TechNet Webcast: Disaster Recovery with Iron Mountain and Microsoft System Center Data Protection Manager 2007 (Level 300) - 11:00 AM
Momentum Webcast: The Value of Premier Services in Tough Economic Times (Level 100) - 1:00 PM
TechNet Webcast: SharePoint Server 2007 and Exchange Server 2007 Integration with Active Directory Rights Management Services (Level 400)
8 Friday
11 Monday
- 9:00 AM
MSDN Webcast: Ease the Onramp to C++ Parallelism in Visual Studio—Intel® Parallel Studio (Level 200)
12 Tuesday
- 9:30 AM
TechNet Webcast: How Microsoft does IT: System Center Configuration Manager 2007 Client Health Strategies (Level 300) - 11:00 AM
TechNet Webcast: How Microsoft does IT: Using Local Policies to Solve Complex System Center Configuration Manager 2007 Client Challenges (Level 300) - 11:00 AM
Momentum Webcast: Government Contractors: How to Build a Successful Foundation for DCAA Compliance (Level 100)
13 Wednesday
- 9:00 AM
MSDN Webcast: BenkoTips Live & On Demand: Building Windows Mobile Applications (Level 200) - 10:00 AM
Momentum Webcast: Using Virtual Earth Across the Enterprise (Level 100) - 11:00 AM
TechNet Webcast: Information About Microsoft May Security Bulletins (Level 200) - 11:00 AM
Momentum Webcast: Microsoft Dynamics GP Can Help You Do More with Less (Level 100) - 11:00 AM
MSDN Webcast: Software Design Tools in Visual Studio 2010 (Level 200) - 12:00 PM
MSDN Webcast: geekSpeak: Managing Browser History from ASP.NET AJAX with Wally McClure (Level 200) - 1:00 PM
MSDN Webcast: Mastering the Microsoft SQL Server JDBC Driver v2.0 (Level 100)
14 Thursday
- 8:00 AM
MSDN Webcast: EPM Auditing Solution Starter Drilldown (Level 300) - 11:00 AM
Momentum Webcast: Microsoft Enterprise Agreement Licensing Briefing (Level 100)
15 Friday
18 Monday
19 Tuesday
- 9:30 AM
TechNet Webcast: How Microsoft does IT: Deploying Windows 7 Using System Center Configuration Manager 2007 and OSD (Level 300) - 11:00 AM
TechNet Webcast: How Microsoft does IT: Using Virtualization with Hyper-V to Deploy System Center Configuration Manager 2007 (Level 300) - 1:00 PM
TechNet Webcast: Microsoft Identity Lifecycle Manager “2” (ILM "2") for IT Professionals (Level 300)
20 Wednesday
- 9:00 AM
MSDN Webcast: BenkoTips Live & On Demand: Exploring Silverlight 3.0 (Level 200) - 10:00 AM
Momentum Webcast: Developers Can Build Solutions Across the Enterprise with Virtual Earth (Level 200) - 10:00 AM
TechNet Webcast: System Center Operations Manager 2007 R2 Interoperability Connectors (Level 300) - 12:00 PM
MSDN Webcast: geekSpeak: SharePoint as a Data Store with J. Dan Attis (Level 200) - 1:00 PM
TechNet Webcast: Cheaper, Better Backups with Microsoft System Center Data Protection Manager 2007 (Level 300)
21 Thursday
- 8:00 AM
TechNet Webcast: File Classification in Windows Server 2008 R2 (Level 300) - 11:00 AM
Momentum Webcast: Determining the Value of Software Assurance Renewal for Your Organization (Level 100) - 1:00 PM
TechNet Webcast: Microsoft Forefront codename “Stirling” – An Integrated Security Suite (Level 200)
26 Tuesday
- 9:00 AM
Microsoft Dynamics Webcast: Introduction to Manufacturing in Microsoft Dynamics NAV (Level 100) - 9:30 AM
TechNet Webcast: How Microsoft does IT: Delivering Internet-based Client Management (Level 300) - 11:00 AM
TechNet Webcast: How Microsoft IT Deploys Application Virtualization (Level 300) - 1:00 PM
TechNet Webcast: Microsoft Forefront codename “Stirling” – Forefront Client Security 2.0 Release Update (Level 200)
27 Wednesday
- 9:00 AM
Momentum Webcast: Winning in High Tech with Wipro and Axonom (Level 100) - 9:00 AM
MSDN Webcast: BenkoTips Live & On Demand: Using the Virtual Earth Silverlight Control (Level 200) - 10:00 AM
TechNet Webcast: Using Windows PowerShell with Hyper-V and Virtual Machine Manager (Level 300) - 11:00 AM
MSDN Webcast: Silverlight 3.0: Business Application Enhancements (Level 200) - 12:00 PM
MSDN Webcast: geekSpeak: Silverlight Game Development with Andy Beaulieu (Level 200)
28 Thursday
- 8:00 AM
MSDN Webcast: How to Tell If Your Project or Solution is "Embedded" (Level 100) - 9:00 AM
MSDN Webcast: Windows Server 2008 R2, NUMA and UMS APIs (Level 300) - 9:00 AM
Microsoft Dynamics Webcast: Customer Service with Microsoft Dynamics CRM and the Customer Care Framework (Level 100) - 9:30 AM
TechNet Webcast: Communication between Project Professional and Project Server: Active Cache Processes and Architecture Drill Down (Level 300) - 11:00 AM
Momentum Webcast: Take Advantage of Limited Time Offers with Microsoft (Level 100) - 1:00 PM
TechNet Webcast: Protect Instant Messenger with Microsoft Forefront Security for Office Communications Server (Level 200) - 5:00 PM
MSDN Webcast: How to Tell If Your Project or Solution Is "Embedded" (Level 100)
How to Install Exchange Server 2010 Beta
Scott Schnoll ha publicado este paso a paso para la instalacion de Exchange Server 2010
http://blogs.technet.com/scottschnoll/archive/2009/04/15/how-to-install-exchange-server-2010.aspx

Now that Exchange Server 2010 is available to download and try in Beta format, I wanted to provide a quick blog on how to install the Exchange Server 2010 Beta.
Installing Exchange Server 2010 begins with installing and preparing the operating system. Exchange Server 2010 can be installed only on Windows Server 2008 Standard Edition or Enterprise Edition. If you plan on trying out database availability groups and mailbox database copies, you will need to use the Enterprise Edition of Windows Server 2008. For more information about the requirements for Exchange Server 2010, see Exchange 2010 System Requirements.
Once the operating system has been installed, several pre-requisites must be installed. These include:
- Operating system components, including RSAT-ADDS (needed on server that will perform schema updates), Web-Server, Web-Metabase, Web-Lgcy-Mgmt-Console, Web-ISAPI-Ext, NET-HTTP-Activation, Web-Basic-Auth, Web-Digest-Auth, Web-Windows-Auth, Web-Dyn-Compression, RPC-over-HTTP-proxy, Web-Net-Ext and Net-Framework. You can install all of these components at one time (e.g., for the Mailbox, Client Access and/or Hub Transport Server roles) by running the following command:
ServerManagerCmd -i RSAT-ADDS Web-Server Web-Metabase Web-Lgcy-Mgmt-Console Web-ISAPI-Ext NET-HTTP-Activation Web-Basic-Auth Web-Digest-Auth Web-Windows-Auth Web-Dyn-Compression RPC-over-HTTP-proxy Web-Net-Ext -Restart
For more information about the prerequisites for Exchange 2010, including those for the Edge Transport server role, see Exchange 2010 Prerequisites.
You might have noticed that Failover-Clustering is not listed as a pre-requisite. There is a feature in Exchange Server 2010 called a database availability group that does use Windows failover clustering technologies. However, thanks to another Exchange Server 2010 feature called incremental deployment, you no longer install failover clustering before installing Exchange. If you decide to use a database availability group, you simply create one, and then add Mailbox servers to it. When you add a Mailbox server to a DAG, we install the Windows failover clustering feature and automatically create a cluster for you. So while you do need to have Exchange installed on an operating system that supports Windows failover clustering, you do not install the failover clustering feature manually, or ahead of time, and you don't manually create a cluster. It makes deploying highly available mailbox databases quick and easy.
Exchange Server 2010 also supports installing the above pre-requisites by using an Answer File with ServerManagerCmd, and answer files are included in the \AMD64\Scripts folder. To use them, you run ServerManagerCmd -ip. For example:
ServerManagerCmd -ip Exchange-CAS.XML
I recommend that you don't use the XML Answer Files for Exchange-Typical or Exchange-MBX as is, because in the Beta build it mistakenly includs the Failover-Clustering feature, which does not need to be installed before Exchange is installed. This is a remnant from the Answer Files we had in Exchange 2007 that we've since removed.
Next, are the software pre-requisites, which include:
- Microsoft .NET Framework 3.5
- Windows Remote Management (WinRM) 2.0 CTP 3
- Windows PowerShell 2.0 CTP 3
- Update from KB 951725
- Update from KB 950888
- Update from KB 951116
- Update from KB 952664
- Update from KB 953290
- Update from KB 958178
See Exchange 2010 Prerequisites for information about and links to other pre-requisites that might apply to your environment (e.g., for Edge Transport and Unified Messaging server roles, and for environments that use System Center Operations Manager).
Once the above pre-requisites have been installed, check Microsoft Update for any additional updates that might be needed. Make sure the system has been rebooted after installing any updates which require a reboot.
Now you're ready to install Exchange 2010. You can perform the installation using the GUI or command-line version of Setup. In this example, I'll use the GUI.
I'll start by launching Setup.exe from the AMD64 folder. This launches the Exchange 2010 splash screen:

As you can see, the Exchange 2010 splash screen is very similar to the one we had in Exchange 2007. Any needed pre-requisites which are detected, are greyed out, indicating they have been installed, and that you can proceed to the next step. In this case, I can proceed directly to Step 4: Install Microsoft Exchange.
I click that link and it launches the GUI version of Exchange Setup, beginning with a file copy process, and the initialization of Setup.

Once Setup is initialized and the file copy process has completed, the Introduction page appears:

I click Next, and the Language Files Location page appears:

I don't have any additional language files, so I'll leave the default setting of Continue setup without language files and click Next. The Language Pack Confirmation page appears:

I click Next, and the License Agreement page appears:

After reading the license agreement, I select I accept the terms in the license agreement and click Next. The Error Reporting page appears:

Error reporting is very helpful to us, which in turn is helpful to our customers, as it enables us to gather a minimal amount of diagnostic data to troubleshoot and resolve errors and crashes more quickly. So I am going to choose Yes (Recommended) and click Next. The Installation Type page appears:

Immediately, you might notice some differences from Exchange Server 2007. First, the Custom Exchange Server Installation option no longer lists any clustered mailbox server roles. That's because clustered mailbox servers don't exist in Exchange Server 2010. Exchange 2010 includes a new feature called Incremental Deployment. This feature enables to you configure high availability and site resilience for your mailbox database after Exchange has been installed.
Second, the default path for the Exchange Server installation is new and different. If I choose Custom Exchange Server Installation, the Server Role Selection page appears:

If I choose Typical Exchange Server Installation instead of Custom Exchange Server Installation and click Next, or once I've completed the Custom Exchange Server Installation choices and clicked Next, the Exchange Organization page appears:

I specify a name for my Exchange Organization, and then I click Next. The Client Settings page appears:

If the Exchange organization uses Outlook 2003 or earlier, or Microsoft Entourage, then a public folder database is needed so that those clients can access system data, such as Free/Busy information. In that case, you would select Yes on this page. Since my organization does not use Outlook 2003 or earlier, or Entourage, I can leave the default setting of No and click Next.
The Customer Experience Improvement Program (CEIP) page appears:

This program helps us improve our software by collecting data about how Exchange Server is used. I'll click Join the Exchange Customer Experience Improvement Program and specify an industry of Computer-Related Products/Services.
I click Next. The Readiness Checks page appears, and Setup automatically performs readiness checks for any installed language packs, as well as the selected server roles to be installed.

As you can see, the readiness checks don't take much time at all. Once all readiness checks have successfully passed, the Readiness Check page will look similar to this:

At this point, the system and server are ready for the installation to begin. I click Install to start the installation of Exchange 2010 Mailbox, Client Access and Hub Transport server roles, as well as the Exchange Management tools (Exchange Management Console and Exchange Management Shell).
While Setup is progressing, a Progress page will be appeared:

Once Setup has completed successfully, the Completion page will appear:

As you can see, installing Exchange 2010 is quick and easy. On my system, Setup took just under 10 minutes to complete.
I prefer to reboot the system before finalizing the installation. Uncheck the Finalize installation using the Exchange Management Console checkbox, and click Finish to complete the Setup process. This returns Setup to the splash screen. Click Close to close the splash screen, and when the Confirm Exit dialog appears:

Click Yes.
Then, reboot the server. OK, technically, you don't need to reboot the server, but I do anyway.
The installation of Exchange Server 2010 is now complete. Check out the Exchange 2010 TechCenter for documentation and other resources for Exchange 2010.
Publish Exchange 2007 OWA via ISA with RSA TOKEN
Few days ago, I perform the configuration for publishing OWA through ISA Server 2006 with a RADIUS authentication to use a RSA Token and use this post from Elan Shudnow to do it.
Procedure:
http://www.shudnow.net/2009/07/01/exchange-2007-owa-via-isa-rsa-authentication-delegation/
When utilizing ISA (in this case, ISA 2006) to publish Outlook Web Access (OWA), there are various options you can choose from in order to authenticate a user. One listener authentication mechanism that is often used is Forms Based Authentication. By default, your ISA form when publishing OWA will look like the following:
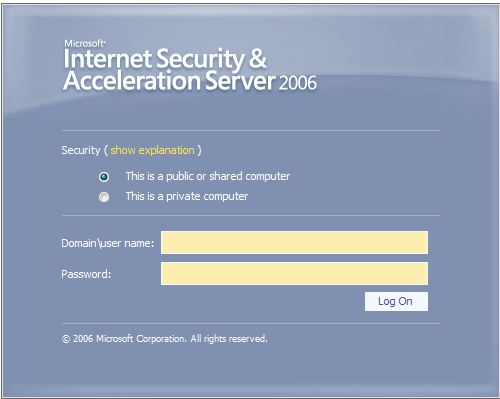
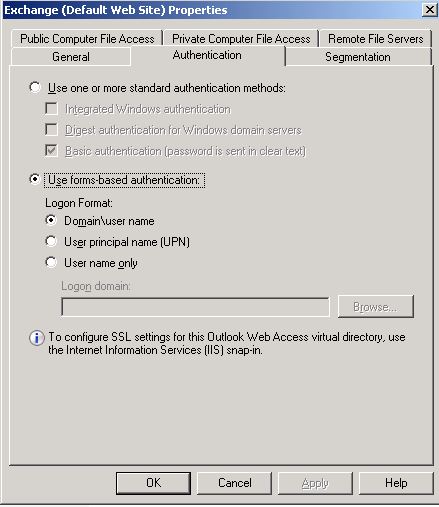
As you can see, by default, it asks you for Domain\User name. By going into the listener authentication options, you can specify the default domain that should be specified if the user does not specify a domain. Without specifying this, if the user were to only enter their user name, authentication would fail as it is not passing the domain back to Exchange. By going into the properties of your OWA listener, you will see an Authentication tab.
Because we will be utilizing RSA, we will choose RSA as the method of Authentication utilizing Forms Based. Because Exchange isn’t set to also authenticate to RSA (only ISA), we will need to collect additional information in the form. This allows a user to also enter their AD credentials so after ISA authenticates a user, ISA can still pass back the AD credentials back to Exchange as the Authentication Delegation mechanism using Basic. Selecting to Collect dditional delegation credentials in the form allows you to utilize either Basic, NTLM, or Negotiate as an Authentication Delegation mechanism.

By clicking on Advanced, we can see the section in which we can configure the domain to automatically pass back to Exchange during the Authentication Delegation. Again, a user authenticates from a browser to a web listener and from there, ISA then takes certain information about the user and passes that back to Exchange which is the Authentication Delegation piece.

But, as you can see, the Domain name piece is greyed out. But if you look at the authentication form for ISA when RSA is enabled, you can see it doesn’t ask for the Domain Name.

Now because of this, if a user doesn’t specify to use a different user name which does allow you to enter a domain\username, the authentication delegation piece will fail as the basic authentication mechanism that you will set on Exchange will want a domain\username passed back. So if we can’t set this in ISA, how do we set it? Well, we can actually configure IIS to automatically assume a specific domain to be used if no domain is specified. While IIS6 and IIS7 are very much different, you can actually utilize the Exchange Management Console to set this option which will stamp IIS appropriately (both IIS6 and IIS7.)
The default authentication option for OWA on a CAS is to use Forms Based Authentication and require a user to specify their domain.
If you specify the following option, choose your domain, and click Apply, it will stamp IIS to assume the specified domain name. A user can still specify their domain or not specify it and both will work when authenticating. This should hopefully make you realize that if ISA relays authentication back to IIS on the CAS, that it won’t matter anymore if the domain is specified or not.

But because our ISA Authentication Delegation for our OWA rule will utilize Basic Authentication, we now want to specify Basic Authentication within Exchange for OWA. But don’t worry, even if you change it from the previous setting of Forms Based Authentication with the assumed domain, IIS will still stay stamped properly. So go ahead and choose Basic. You will be prompted to do an IISReset -Noforce. Go ahead and do it after choosing Basic.

So back over to ISA, if we go into our Outlook Rule, we can see the Authentication Delegation set to Basic which it will need to be since that’s what the Authentication option is set to for OWA on our CAS.

So taking everything into account what we did above, what happens is the user authenticates to ISA utilizing a form and specifies their username without the domain, RSA key, and password for their username. When they click Log On to authenticate, ISA will authenticate the user with RSA, and when that passes, ISA will utilize basic authentication due to the authentication delegation being set to basic to pass the username and password they specified (with no domain) back to OWA. Because IIS is stamped to automatically utilize the domain even if it wasn’t specified, authentication will work and the user will be logged into OWA.
Resources:
Outlook Web Access Server Publishing in ISA Server 2004: RADIUS and Forms-based Client Authentication
Enabling RADIUS authentication for the OWA Forms-Based Authentication in ISA Server 2004
Exchange 2010 Management Architecture – Using a single machine to manage multiple Exchange 2010 Organizations
Henrik Walther ha publicado este interesante articulo
Introduction
Exchange 2007 was the first Exchange version where the management architecture was based on Windows PowerShell (more specifically PowerShell 1.0). Actually, both the Exchange 2007 Management Console and Shell were built on top of the PowerShell engine bringing many benefits with it. Although it took some time, many Exchange administrators quickly learned to use the shell and therefore also optimized the operational efficiency within the organization.
Without surprise the management architecture in Exchange 2010 is also based on Windows PowerShell, but the new Windows PowerShell 2.0 version. PowerShell 2.0 includes a lot of improvements, and of course Exchange 2010 takes advantage of several of these. One of them is the new PowerShell Remoting feature, which uses WS-Management (aka WS-MAN or WinRM), which is a Windows Server 2008 and Windows Vista component with the task of making management of servers, devices and applications easier across the organization.
In this article I will explain what remote PowerShell is and how this new feature makes it possible to manage Exchange 2010 servers within an organization as well as across multiple Exchange 2010 organizations using the Exchange Management Console and Shell and Windows PowerShell 2.0 - all running from the same management server.
Note:
This article is based on an early beta version of Exchange 2010, so any information is subject to change with later builds of Exchange 2010.
What is Remote PowerShell?
In order to explain this, let us jump back to Exchange 2007. Although the Exchange 2007 Management Shell (EMS) allowed Exchange administrators to manage all Exchange 2007 servers within an Exchange organization from a single management server on which the Exchange Management tools were installed, the cmdlets actually ran in the host/process of the management server itself. The management server then established RPC connections to the Exchange servers that were manipulated.
In Exchange 2010, the management architecture is based on Remote PowerShell included with Windows PowerShell 2.0. Remote PowerShell provides an RBAC-based permission model making it possible to grant much more granular permissions (Exchange 2007 used ACLs), standard protocols that makes it easier to manage Exchange 2010 servers through firewalls, and explicitly separates “client” and “server” portion of the cmdlet processing. In addition, it uses WS-MAN which makes the integration with the Windows operating system more seamless.
The current public Exchange 2010 beta version includes both a local and a remote Exchange Management Shell, but this is only because all the cmdlets are in the process of being moved to the remote Exchange Management Shell version. So by the time we reach RTM, Exchange 2010 will no longer include a local Exchange Management Shell.
This means that no matter if you are administering an Exchange 2010 server using the local Exchange management tools installed on that server or a dedicated management server, you use the remote Exchange Management Shell (Figure 1). As mentioned previously, the public beta version of Exchange 2010 also includes the local Exchange Management Shell, so if necessary (there is still some cmdlet’s that do not work properly in the remote EMS) you can use this one as well.

Figure 1: Remote Exchange Management Shell
When launching the remote Exchange Management Shell, it connects to the local PowerShell virtual directory (Figure 2) created by the setup wizard in IIS, when the Exchange 2010 Management tools are installed on a machine.

Figure 2: PowerShell Virtual Directory in IIS Manager
When the remote EMS connects to the PowerShell vdir, any necessary cmdlets are imported from the server-side session (aka runspace) to the client-side session (Figure 3) or more specifically references to these cmdlets are imported. When the cmdlet references have been imported, you can start managing the Exchange 2010 server just like you normally do when using the EMS.

Figure 3: Creating PowerShell session and importing server-side cmdlets
Enabling Remote Exchange Management Rights for a User
By default the Active Directory account you used to deploy Exchange 2010 in your forest will be granted remote PowerShell management rights. If you want to grant this right to another AD account, you must use the Set-User cmdlet with the RemotePowerShellEnabled parameter. If I for instance wanted to grant this right to my own AD account, I would use the following command:
Set-User ‘Henrik Walther’ –RemotePowerShellEnabled $True

Figure 4: Granting Remote PowerShell management rights to a user
Connecting to a remote Exchange 2010 Server using the Remote Exchange Management Shell
If you want to connect to the PowerShell virtual directory on another Exchange 2007 server in the organization or in another Exchange organization, you use the New-PSSession and Import-PSSession cmdlets.
When establishing a new Exchange Management Shell session against a remote Exchange 2010 server, the interesting thing is that any commands you run from the shell on the local Exchange 2010 server actually are executed on the Exchange 2010 server, you just connected to.
Let us connect to a remote Exchange 2010 server in the same Exchange organization.
If the certificate installed on the remote Exchange 2010 server you wish to connect to is not trusted by the local machine, the first thing you must do is to either import the certificate or create a variable that skips certificate CA, CN, and Revocation checks. To create the variable type:
$SkipCertificate = New-WSManSessionOption –SkipCACheck –SkipCNCheck –SkipRevocationCheck

Figure 5: Creating skip certificate variable
Now create a new remote Exchange Management Shell session:
$Session = New-PSSession –ConfigurationName Microsoft.Exchange –ConnectionUri https://

Figure 6: Command to create new PowerShell session with implicit credentials
Note:
Since we are connecting to a local Exchange 2010 server in the forest, we use implicit credentials (Kerberos authentication).
With the remote Exchange Management Shell session created, let’s import it to the client-side session:
Import-PSSession $Session

Figure 7: Creating new remote Exchange Management Shell session and importing server-side cmdlets
Explicit credentials
If you wish to connect to an Exchange 2010 server in another Exchange organization, you should use explicit credentials, which means that you should first create a variable using:
$UserCredential = Get-Credential

Figure 8: Creating user credential variable
You can then create the remote Exchange Management Shell session using:
$Session = New-PSSession -ConfigurationName Microsoft.Exchange -ConnectionUri https://

Figure 9: Command to create new remote Exchange Management Shell session with explicit credentials
Using the Exchange Management Console
Now that we have seen how to use the remote Exchange Management Shell to manage Exchange 2010 servers within an organization or across organizations, it is time to switch to the Exchange Management Console and show you how it is possible to manage multiple Exchange 2010 organizations from the same EMC.
So, let us open the Exchange Management Console. In the navigation pane, select Microsoft Exchange and then click Add Exchange Forest in the Action pane as shown in Figure 10. When the Add Forest windows appears, enter the credentials of the Administrator you want to use to connect to the other Exchange organization. Since we’re connecting to another on-premise Exchange organization, select Microsoft Exchange On-Premises.
Note:
You can use the Microsoft Exchange Online option to connect to an Exchange 2010 organization in the cloud. Currently, you can only connect to a tenant domain at Exchange Labs or Live@edu.
Now enter the URL of the remote PowerShell vdir you wish to connect to. Use the following format:
https://E2K10Server.domain.com/PowerShell/
Then click OK.

Figure 10: Adding an Exchange organization from another forest to the EMC
The remote Exchange organization will now be added to the navigation pane in the left side of the Exchange Management Console as shown in Figure 11.

Figure 11: Additional Exchange organization added to the EMC
You can now manage this organization as was it a local Exchange organization you were managing.
Note:
Since Exchange 2010 is still under development, please bear in mind that you may get some errors when doing specific management tasks against a remote Exchange organization.
Cross-Forest Mailbox Moves using the Exchange Management Console
Unlike Exchange 2007 you can now do cross-forest mailbox moves directly from the Exchange Management Console. The reason why I mention this in this article is because one of the requirements before you can move a mailbox to another forest via the EMC is that you must add the Exchange organization of the target forest to the EMC like we did in the previous section. When you have done so, you right-click on the user mailbox(es), you wish to migrate and select New Move Request in the context menu (Figure 12).

Figure 12: Creating a new Move Request
This brings up the New Move Request wizard shown in Figure 13. As you can see you must select the target forest in the drop-down menu.

Figure 13: Specifying the target forest the mailbox should be migrated to
I will not show you how to do the actual mailbox migration here as its outside the scope of this article, but if you begin playing with this feature, it is important to note that you must have migrated/replicated the AD user account to the target forest using ILM or another migration tool before you move the mailbox. As some of you know this is different from Exchange 2007, where it was not required to have the AD account in place in the target forest before migrating the mailbox.
Managing Exchange 2007 and 2010 Servers from the same Machine
Another thing that is quite cool, especially when talking Exchange 2007 to Exchange 2010 transitions in large organizations consisting of many thousands of users, is the fact that unlike Exchange 2003 to Exchange 2007 transitions, you can install both the Exchange 2007 and Exchange 2010 Management tools on the same machine. Yes you heard right. You simply install the Exchange 2010 prerequisites on the machine that is Windows PowerShell 2.0, WS-MAN and .NET Framework 3.5. When you have installed the prerequisites, you install the Exchange 2010 Management tools followed by the Exchange 2007 Management tools.
Note:
Please bear in mind that it is only the Exchange 2007 and 2010 Management tools that can coexist on the same machine. You should never try to install any of the other Exchange server roles on it.

Figure 14: Exchange 2010 Setup.exe Bootstrapper
Make sure you only select Management Tools on the Server Role Selection page (Figure 15).

Figure 15: Selecting Management Tools on the Serve Role Selection page
When Management Tools have been installed successfully, click Finish (Figure 16).

Figure 16: Exchange 2010 Management Tools installed successfully
Now launch the Exchange 2007 Setup wizard (Figure 17).

Figure 17: Exchange 2007 Setup.exe Bootstrapper
Make sure you only select Management Tools on the Server Role Selection page (Figure 18).

Figure 18: Selecting Management Tools on the Serve Role Selection page
When Management Tools have been installed successfully, click Finish (Figure 19).

Figure 19: Exchange 2007 Management Tools installed successfully
When the management tools have been installed, you can find them under All Programs in the Start Menu as shown below.

Figure 20: Where to find the management tools
It gets even better because you can actually run the management tools for each Exchange version simultaneously (Figure 21).

Figure 21: Exchange 2007 and 2010 Management consoles side by side
The interesting thing about this is you actually could create a custom MMC console including the management tools snap-in from both Exchange versions (Figure 22).

Figure 22: Exchange 2007 and 2010 Management console snap-ins in same MMC
Using Windows PowerShell 2.0
So far I have showed you how to manage Exchange 2010 using the remote Exchange Management Shell as well as the Exchange Management Console, but you know what? It is not even required to install the Exchange 2010 Management tools on a machine in order to manage Exchange 2010, at least not if you prefer to do so using the Shell. Remember I mentioned that when connecting to the PowerShell vdir on a remote Exchange 2010, the needed cmdlets would be imported to the client-side session/runspace?
If you like working from the shell the only required components on the machine from where you managed Exchange 2010 servers are Windows PowerShell 2.0 and WS-MAN and you are rolling.
Note:
At the time of this writing, the WS-MAN component can only be installed on Windows Server 2008 and Windows Vista, but I heard a rumor that the WS-MAN team are working on a version for Windows XP.
When you have installed WS-MAN and Windows PowerShell 2.0 on a machine, launch Windows PowerShell by clicking Start > All Programs > Windows PowerShell V2 (CTP3) > Windows PowerShell V2 (CTP3) as shown below.

Figure 23: Launching Windows PowerShell 2.0 (CTP3)

Figure 24: Windows PowerShell 2.0 (CTP3) shell
Again, we will now use the New-PSSession and Import-Session cmdlets. If the certificate installed on the remote Exchange 2010 server you wish to connect to is not trusted by the local machine, you must either import the certificate or create a variable that skips certificate CA, CN, and Revocation checks. To do so enter:
$SkipCertificate = New-WSManSessionOption –SkipCACheck –SkipCNCheck –SkipRevocationCheck

Figure 25: Creating skip certificate variable
Now create a new PowerShell session:
$Session = New-PSSession –ConfigurationName Microsoft.Exchange –ConnectionUri https://

Figure 26: Command to create new PowerShell session with implicit credentials
With the PowerShell session created, let’s import it to the client-side session/runspace:
Import-PSSession $Session

Figure 27: Creating new PowerShell session and importing server-side cmdlets

Figure 28: Importing the new PowerShell session to the client-side session/runspace
Explicit credentials
If you wish to connect to an Exchange 2010 server in another Exchange organization, you should use explicit credentials, which means you first should create a variable using:
$UserCredential = Get-Credential

Figure 29: Creating user credential variable
You can then create the PowerShell session using:
Session = New-PSSession -ConfigurationName Microsoft.Exchange -ConnectionUri https://

Figure 30: Command to create new PowerShell session with explicit credentials
Remote PowerShell Management Examples
Now let us try to get a list of the mailboxes in the Exchange organization using the Get-Mailbox cmdlet.

Figure 31: Listing all mailboxes in remote Exchange organization
Next let’s create a new mailbox.
New-Mailbox –Name ‘Test User 2’ –UserPrincipalName ‘Testuser2@exchangelabs.dk’
Press enter then specify the password for the user mailbox and press enter.

Figure 32: Creating a new mailbox in the remote Exchange organization
Okay let us now create a new distribution group and add the new test user to it.
New-DistributionGroup –Name ‘Test Distribution Group’

Figure 33: Creating a new distribution group in the remote Exchange organization
We add the user mailbox to the distribution group using:
Add-DistributionGroupMember –Identity ‘Test Distribution Group’ –Member ‘Test user 2’

Figure 34: Adding the new user mailbox to the new distribution group
Let us now verify the respective user mailbox was added to the distribution group:
Get-DistributionGroupMember –identity ‘Test Distribution Group’

Figure 35: Listing members of the new distribution group
These were just very simple examples, but you can, as mentioned, do much more complicated stuff. Actually, all the things that are possible using the Exchange Management Shell.
Disconnecting the Remote PowerShell Session
When you are finished managing the remote Exchange 2010 server or organization, you can disconnect the remote PowerShell session using the following command:
Remove-PSSession $Session
Alright this concludes this article. I hope you found it interesting.

